Writing an R package from scratch

Anyone who has created their own R package has probably come across Hilary Parker’s awesome blogpost, that walks you through creating your very first R package. The comprehensive detail on everything R packages can be found in Hadley Wickham’s superb book.
In this post I am going to walk through some of the developments in the package development space since Hilary wrote her blog four years ago, in particular focussing on the relatively recent usethis package. I’ve made the assumption for this following tutorial that you’re a sane individual and that you’re using the RStudio IDE. My main motivation stemmed from Hadley’s tweet:
A super useful contribution would be to take @hspter’s awesome post and update it to use the latest usethis goodies https://t.co/ozb2M8lpuk
— Hadley Wickham (@hadleywickham) August 14, 2018
The package I have created during the course of this blog can be found on my GitHub.
Initial Setup
Within this section we will assemble the bare bones of a package and is very similar to Hilary’s blog I linked to earlier.
Step 0: Packages we need
The three packages we require are devtools, roxygen2 and usethis.
pkgs <- c("devtools", "roxygen2", "usethis")
install.packages(pkgs)
library(devtools)
library(roxygen2)
library(usethis)
Step 1: Creating the package
The easiest way to create your package is to use usethis::create_package.
create_package("dogs")This will create our package "dogs" in our current working directory. You can explicity state the path if you wish to create it elsewhere, e.g. "C:/Users/Tom/Documents/dogs". Upon completion you will see something similar to:
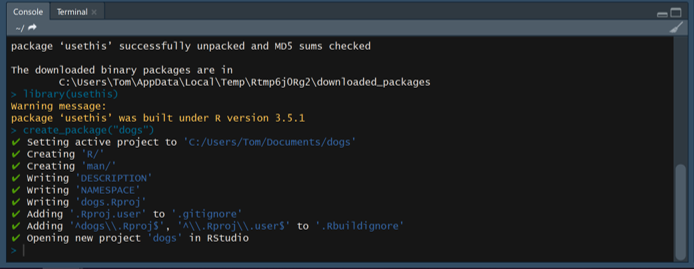
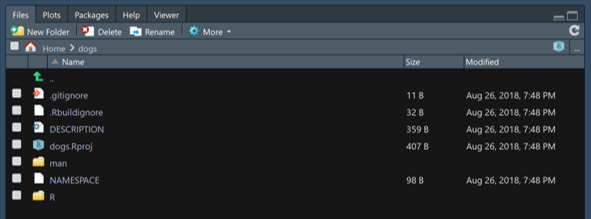
And the following files can be observed:
Step 2: Adding functions
Functions for an R package should be created within the R subdirectory. We can utilise usethis::use_r to quickly create a script to contain our first function.
use_r("dog_functions")Now we can add the functions we want to this file. If you don’t have any ready ones to hand, I prepared one earlier:
If you want to know more about writing your first function, I thoroughly recommend this video by Roger Peng.
dogs_over_cats <- function(agree=TRUE){
  if(agree==TRUE){
    print("Woof woof!")
  }
  else {
    print("Try again.")
  }
}
Congratulations, you have now created the barest of bare minimum packages. You can now load your new function using ctrl + shift + l, or run devtools::load_all().
Take your new function out for a spin:
dogs_over_cats()## [1] "Woof woof!"Step 3: Adding function documentation
Now that we’ve created our function, it’s time to add some documentation that will help us remember how to correctly use our function when we forget! Thanks to the workings of roxygen2 this is a simple process. Navigate back to your funciton (bonus points if you use usethis::use_r). To create the documentation we need to add special comments above the function, that will be used to generate the help files. More information on documenting functions can be found here. Below you can see an example for my earlier dogs function.
#' @title A Dog Function
#'
#' @description This function allows you to express your love for the superior furry animal.
#' @param agree Do you agree dogs are the best pet? Defaults to TRUE.
#' @keywords dogs
#' @export
#' @examples
#' dogs_over_cats()

dogs_over_cats <- function(agree=TRUE){
  if(agree==TRUE){
    print("Woof woof!")
  }
  else {
    print("Try again.")
  }
}
After we’ve added this we simply run ctrl + shift + d or devtools::document:
document()This function generates the documentation (.Rd) files and then stores them in the man subdirectory. We can now install this package and check out our swanky new documentation. Install your package using ctrl + shift + b or devtools::install.
install()Now try searching for your new function, here’s what I receive when I type ?dogs_over_cats:
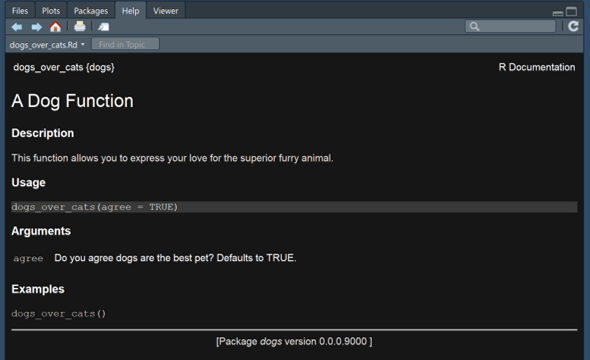
Congratulations, you’ve created a real R package, complete with documentation that will store all the R functions you could ever devise.
Further Development
In this section I’m going to walk through some of the additional things you can do to begin the journey to the perfect package and will continue to exploit the awesome usethis package.
Step 4: Editing your Description
Hopefully you will remember part of the earlier setup involved creating a Description file. This will look similar to the following:
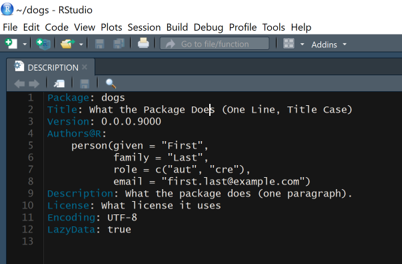
Fill in the title and description lines to give a broad understanding of the purpose of your package. The package line displays the name of the package. The Authors@R line should be replaced with your information, the “aut” role signifies author and “cre” signifies maintainer. License notates under what conditions your code can be used. Luckily there is a set of usethis functions that will populate the correct fields with some of the most common licenses. For my package I used:
use_cc0_license("Tomas Westlake")This really handy function changes the correct field of the description and provides you with a LICENSE.md file.
My finished dogs package description looks like:

The Description file is also where you add package dependencies, as well as suggest other packages that work well in tandem. To read more detail on the Description file, see this section in Hadley’s book
Step 5: Add package documentation
So although we have documentation for our functions so far, we don’t have anything for the overall package. Running:
usethis::use_package_doc()Will generate a dummy dogs-package.R file in the R folder.
Then using:
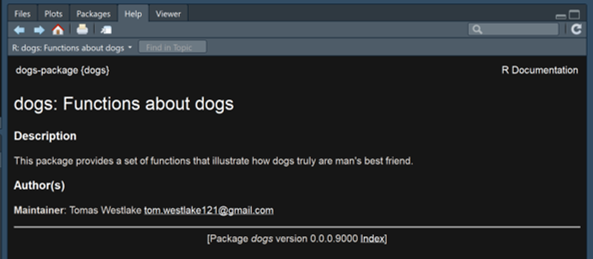
devtools::document()The dummy package file will lead to roxygen2 creating overall documentation for your package, drawing upon the fields we have just filled out in the description. Trial this by installing your package, ctrl+shift+b or devtools::install and typing package?dogs.
This is my result:
Step 6: Adding a Git repo
Git is the premier version control system that will keep a track of all the code you create and edit, and will allow you to share those changes with others. To learn more about using Git check out this section in Hadley’s book.
With the usethis package (so long as you have Git installed and configured) it is really simple to add a git repo for your package:
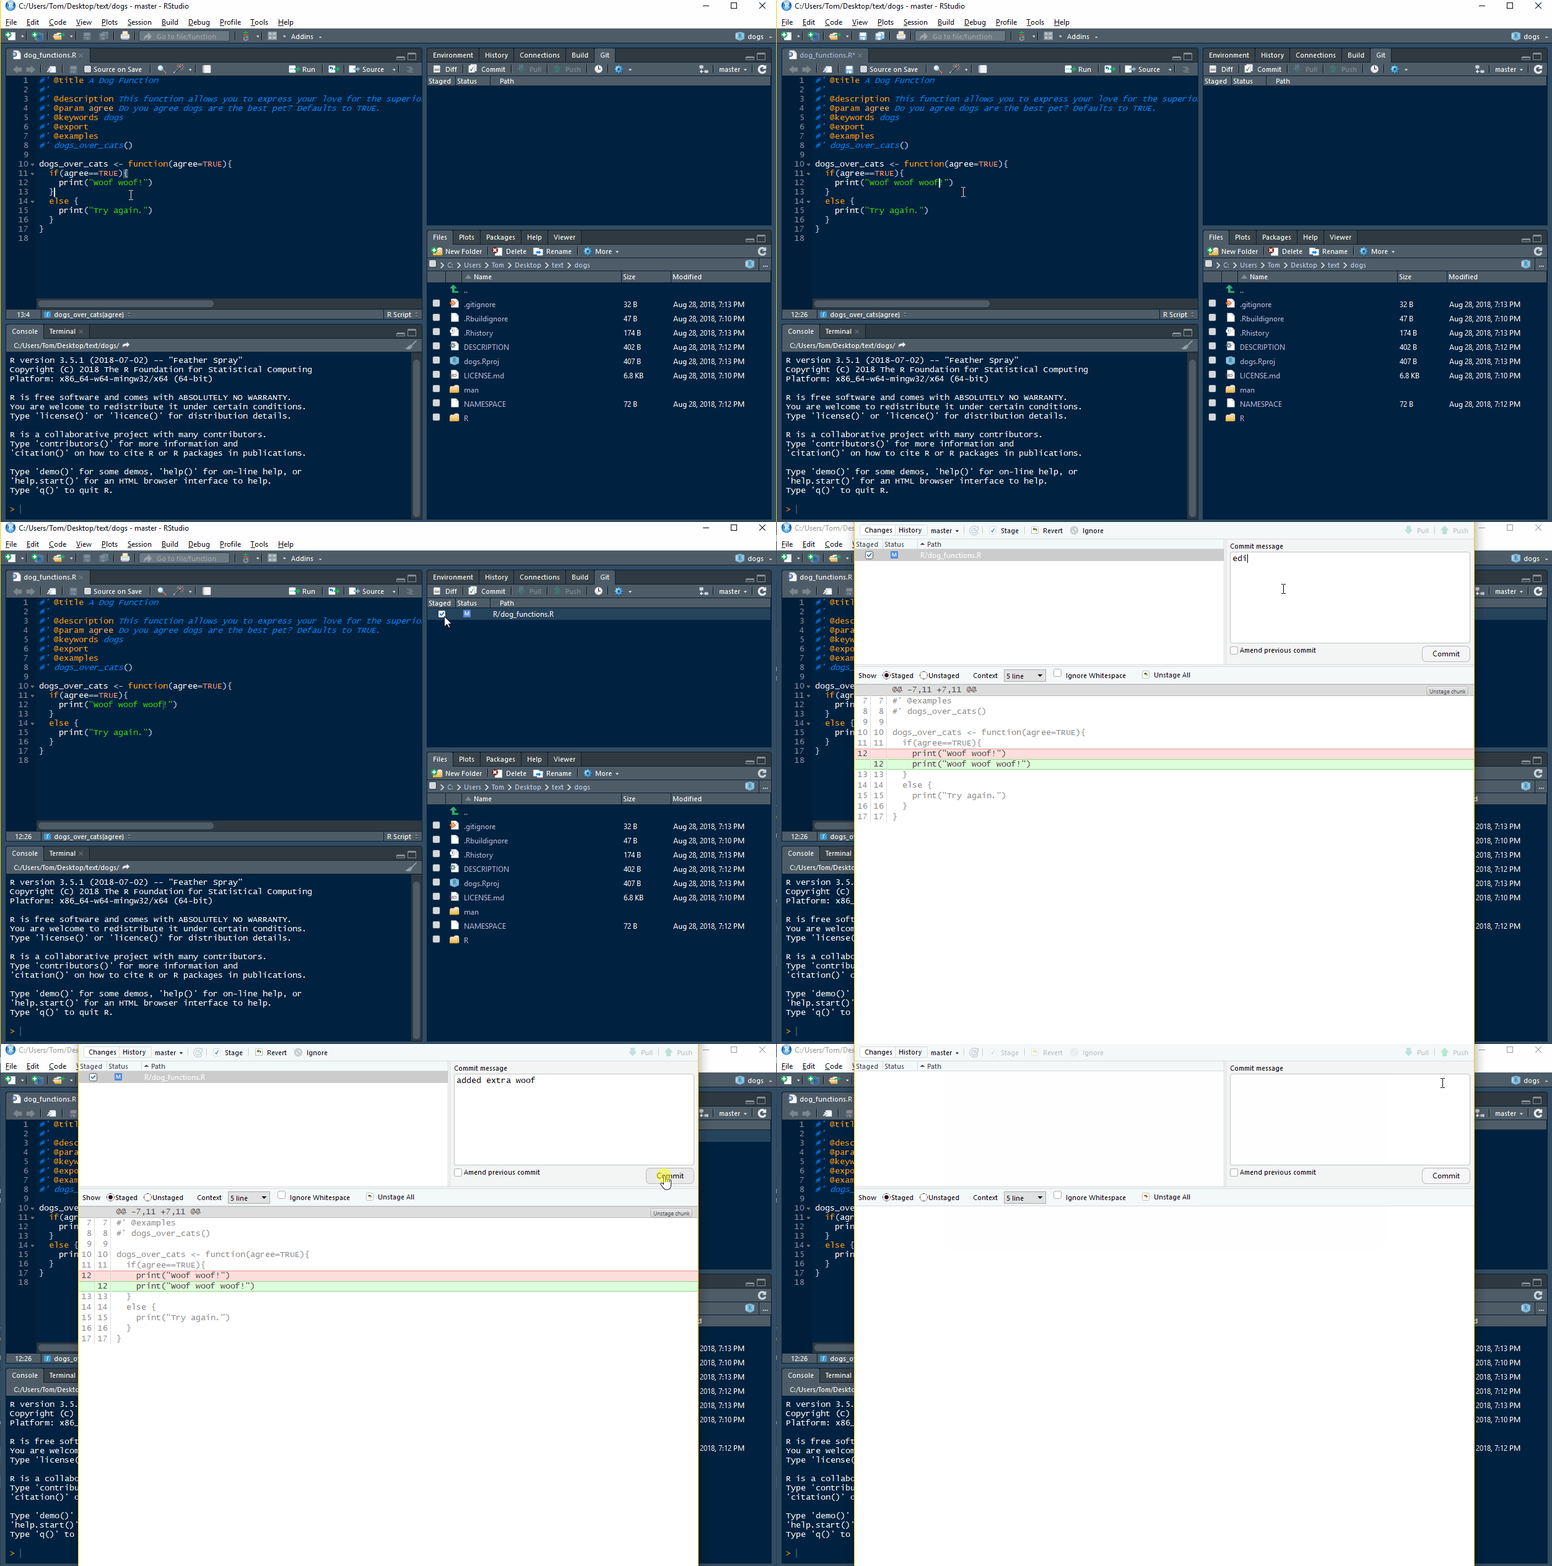
usethis::use_git()This will create a git repo, ask if you want to commit your current files (yes you do) then ask to restart RStudio to provide you with the Git pane. Try editing a function, saving and then using the git panel on the right to commit your changes. Watch me do this in my dogs package below:
Now whilst git on it’s own is great, it reaches truly awesome levels when paired with a site like GitHub. And guess what, the usethis package can speed up this process for you too!!
Step 7: Uploading to GitHub
To complete this step you will need to have your own GitHub account.
Uploading your package to GitHub is incredibly useful. Any R user will be able to install your package using devtools::install_github. It also gives you a nice home for your package, a place to add and track issues and facilitates collaboration. So lets jump straight in!
There is one step before we can upload our package to our GitHub account - we must make a Personal Access Token, PAT. We can use this token instead of a password for authentication purposes. Luckily usethis has our back again. Running:
browse_github_pat()Will take us straight to the relevant GitHub webpage. Then we generate a token (leave the defaults selected) and copy this token to our keyboard. I will denote my token as “xxx” in following code. Now we have our token we can upload our package to GitHub.
use_github(protocol = "https", auth_token = "xxx")And…. it just works!!! Amazing. It also adds two new links to our description file, one to the GitHub URL and one to the Issues tab.
Step 8: Adding a Readme
On a GitHub site, README.md files are displayed below the files. usethis makes it quick to generate one of these. You can choose either to have a straight .md file, or an RMarkdown file that can be knitted to give you the .md file. Personally I prefer the .Rmd file, because you can then easily embed R code within oyur README. Running:
use_readme_rmd()Will generate a skeleton file that you can edit to give an overview of your package. You can see the README I generated here.
Step 9: Adding a logo
Now if you happened to navigate to my previous link, you are probably wondering, how do I get such an awesome logo? First I downloaded the Powerpoint template found on this great blog on making a Hex Sticker and customised it.
And guess what, usethis has a function to allow me to quickly add a logo!
use_logo("C:/Users/Tom/Desktop/dogs_hex.png")This section of code will add the picture you provide, resized to the correct dimensions, to a subdirectory within your project. It also copies the code you need to add this logo to your package README. Navigate to your README.Rmd and paste the code over your current title (# dogs for me). Knit the README and you will see the results!
Wrap up
Ok so we’ve covered a lot of ground in this blog, but there is so much more we can with usethis! One really useful feature is that you can store a lot of default values in your .RProfile, which is super handy when you are creating plenty of R Packages. You can find more about this on the official usethis website.
I’m also hoping to write another blog or two going into more detail on some other parts of package development, such as unit testing.
